Microsoft Tip: Scheduling Assistant
Need an easy way to see if people are available for a meeting?
Try Outlook’s Scheduling Assistant!
What Is Scheduling Assistant in Outlook?
The Scheduling Assistant is a feature that allows you to select the best time available and conference room availability when setting up a new meeting request.
How to Use Scheduling Assistant in Outlook
Follow these four steps to use the Scheduling Assistant in Outlook Calendar.
Step 1: Open Outlook Calendar and Select “New Meeting”
This will open a new window where you’ll be able to edit the details of the meeting based on your needs.
Step 2: Fill In the Meeting Details
On the “New Meeting” screen, add the basic details of the meeting, such as meeting title, required attendee list, optional attendee list, and optimal time in the “Time” slot.
Also, select the location - you can choose the location of the meeting by adding the meeting room location in the “location” slot.
Step 3: Select “Scheduling Assistant”
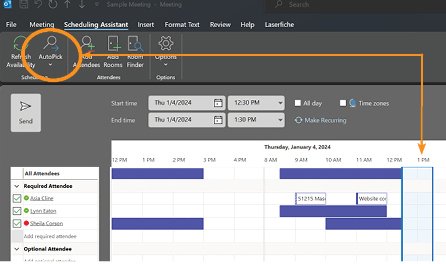
After setting up the basics of the meeting, click the “Scheduling Assistant” button.
The Scheduling Assistant will show you availability based on attendees' working hours and conference room availability.
Your goal here is to manually select the time suggestion when all or most attendees are available.
There are five different colors that appear based on the availability of the attendees:
A blank row means that the attendees have availability.
A light gray row with dots means that the attendee is working elsewhere.
A light blue hashed block means that this is a tentative appointment time that could work.
A dark blue row means that the attendee is busy (unavailable).
And a pink row with crosses means that the attendee is out of the office and, therefore, unavailable.
Note: the colors may differ between versions of Outlook – keep a close eye on the legend provided and the patterns used.
If you are struggling to find a time that suits you, you can use the “AutoPick” option. This will help the Outlook Scheduling Assistant to pick up a time option that works for everyone.
Step 4: Check Out the Details of the Event and Send the Meeting Invitation
After picking the perfect time with the Scheduling Assistant, review the details of the event.
You can add attendees, change the title, modify the time, and select a new room if needed.
Then, click “Send,” and forward the meeting invitation to everyone.
Since you have already checked everyone’s schedule with the Outlook Scheduling Assistant, the meeting should not interfere with other work-related events.
Summary: Using the Scheduling Assistant in Outlook
As you can see, the Scheduling Assistant can save you a lot of time if you are struggling to find the right time for a meeting or event. Let’s recap the most important information:
To use the Scheduling Assistant in Outlook, it’s recommended to add the attendees and ideal time before launching the Assistant.
The Scheduling Assistant shows time suggestions based on the calendar of the meeting attendees.
If you are struggling to manually select the best time, use the AutoPick feature so the Assistant finds the best time for you.
Check out the meeting details prior to sending the invitation and make the necessary changes so the meeting does not interfere with others’ calendars.


